Natural-looking brows come from placement and pressure, not from piling on pigment.
A good brow pencil should let you sketch a believable shape, add a few hair-like strokes where you need them, then disappear into your natural brow texture once you blend. If your brows look “drawn on”, it usually means the front edge sits too harsh, the colour sits too solid, or the product choice fights your brow type.
We’ve tracked brow pencil pricing across UK retailers since 2010, and the same pattern shows up again and again: the pencils that stay in baskets tend to be the ones that make small corrections easy. Micro tips. Buildable formulas. A spoolie that actually blends.
This guide covers a step-by-step method: brow mapping, filling, hair-stroke detailing, blending, and setting. We’ll also flag the mistakes we see most, plus the best pencil picks (with real “from” prices) for different brow situations.
Before you start: what a “natural” brow pencil finish really means
Natural brows still have structure. They just don’t look like a single block of colour.
Up close, real brows show gaps, direction changes, and density shifts. The front (near the nose) usually looks softer, the arch looks slightly deeper, and the tail looks more defined. Your pencil work should copy that pattern instead of flattening it.
Formula matters here. Most brow pencils rely on a mix of waxes (for slip and hold), pigments (colour), and often powdery fillers (to soften the finish). Waxes help product grip hair and skin, but heavy wax with heavy pressure can look shiny or “stamped”. Powdery formulas can look more diffused, but they can also skip on dry skin or cling to flaky patches.
Tip shape decides your technique. A microfine tip encourages tiny strokes. A triangular or slanted tip fills faster and can still edge cleanly, but it needs a lighter hand at the front.
Our price feeds show big swings on prestige brow pencils at Space NK, John Lewis, and Cult Beauty, while Benefit often sits in the mid-range and moves during multi-buy events. If you want a pencil you can repurchase without flinching, it helps to pick a formula that works with your brow style rather than fighting it.
Step 1: Brow mapping that still looks like you
Mapping sounds technical. It’s just a way to stop the two brows from drifting into different postcodes.
Use three points: start, arch, end. You can do this visually in the mirror, or with your pencil as a straight edge. Keep it subtle. A natural brow rarely starts too far in or ends in a dramatic flick.
Here’s a simple mapping routine that keeps the result believable:
- Start: look straight ahead. Mark a tiny dot where the brow should begin (generally in line with the side of the nose). Keep this soft; a harsh inner start is the fastest route to “Sharpie brow”.
- Arch: find the highest point of your brow bone. Mark a dot slightly before your natural highest hair point if your tail drops.
- End: follow the outer corner direction of your eye. Stop when the tail would look balanced, not when it reaches “as far as possible”.
- Connect lightly: sketch a faint guideline along the bottom edge from the start area to the tail. Save the top edge for last so you don’t overbuild height.
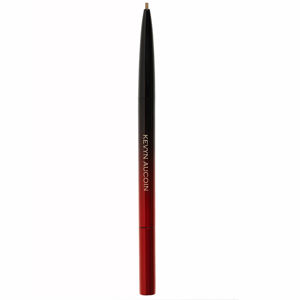
For mapping with minimal risk, we like a pencil that gives controlled colour fast, then blends out without leaving a hard ridge. Benefit Goof Proof Eyebrow Pencil (from £10.80) suits this step because it glides easily and offers waterproof, smudge-proof wear—useful if you tend to touch your face or you get caught in drizzle on the commute.
If you prefer a more structured outline, a triangular tip can help you keep the underside clean. Anastasia Beverly Hills Rotulador Lápices De Cejas (from £9.10) has that triangular shape designed to outline and fill with thin or thick strokes.
One rule: once you map, step back from the mirror. If you only like it from two inches away, it won’t read natural in daylight.
Step 2: Lay down a soft base (the “shadow”, not the lines)
Think of this as creating the background your hair strokes will sit on.
Start in the middle of the brow, not the front. Most people overdo the inner third, then spend the rest of the routine trying to undo it. Use light pressure and short movements that follow hair direction.
For a base, you want even, buildable pigment. A classic waxy pencil can work well because it deposits colour without needing repeated passes. Anastasia Beverly Hills Perfect Brow Pencil (from £13.50) sits in that “classic pencil” category, with a soft, waxy tip intended for filling and defining.
If your brows look sparse and you want a fuller effect without drawing each hair, a fibre-plus-powder pencil can give a more diffused volume. Benefit Gimme Brow+ Volumizing Pencil (from £9.65) combines fibres and powder that attach to existing hairs, building depth and dimension. It also includes a spoolie, which matters more than brands like to admit.
Technique matters more than the tool here. Try this sequence:
- Place the pencil at the mid-brow.
- Use side-of-tip shading (not the point) to add a sheer veil of colour.
- Move toward the tail with slightly more pressure.
- Stop before the inner third looks filled. Leave it airy.
Then blend with the spoolie using upward strokes at the front, and outward strokes through the body and tail. If blending removes everything, your pressure stayed too light or your pencil sits too dry for your skin. If blending does nothing, you pressed too hard.
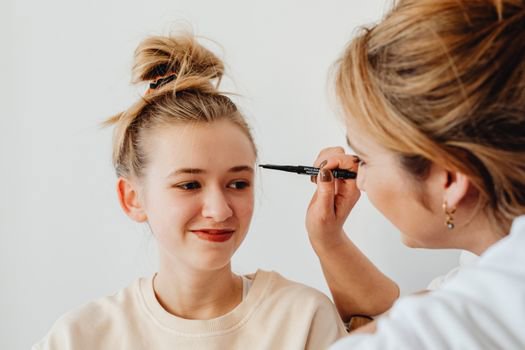
Step 3: Draw hair-like strokes that don’t look like marker lines
This is where micro tips earn their keep.
Hair strokes should look slightly imperfect. Real brow hairs vary in thickness, spacing, and direction. If every stroke matches, the result looks artificial.
For precise strokes, microfine pencils do the heavy lifting. Benefit Precisely, My Brow Pencil (from £10.00) focuses on microfine detailing and aims to create hair-like lines for dimension and depth. MAC Pro Brow Definer 1Mm-Tip Brow Pencil (from £19.20) uses a 1mm tip with waterproof, smudge-proof wear and buildable colour for fuller-looking brows.
Also worth considering if you want an ultra-slim retractable: Anastasia Beverly Hills Brow Wiz Deluxe (from £7.80) uses a fine tip and a wax formula designed to add texture and the look of fuller brows.
Stroke method that reads natural in real life:
- Front: hold the pencil further back for less pressure. Draw 3–6 tiny strokes upwards, leaving skin visible between them.
- Mid-brow: angle strokes diagonally, following your natural growth. Keep them short.
- Tail: use slightly longer strokes and connect gaps, but don’t “colour in” the whole tail as one shape.
- Check symmetry: match density, not shape. Twins don’t exist.
Two quick warnings. Don’t outline the entire brow first, then fill. And don’t add hair strokes on top of a heavy base. Both create a layered, obvious look.
If you want a pencil designed to mimic a microbladed effect with precise strokes and up to 12-hour wear, Too Faced Super Fine Brow Detailer (from £14.40) positions itself for that kind of detailing, with a micro-fine, bevel-tipped format.
Step 4: Blend like you mean it (and keep the front edge soft)
Blending turns “pencil work” into “brows”.
A spoolie blends pigment into hair, breaks up harsh edges, and lifts the front so it looks fluffy rather than stamped. Many people blend once, lightly, then wonder why everything still looks sharp.
Try a two-stage blend:
- Stage one: brush through the whole brow to distribute product. Use short, firm movements.
- Stage two: concentrate on the inner third. Brush upwards and slightly out. Keep going until the start looks like a gradient.
- Spot-fix: if the tail lost definition, add one or two hair strokes back in. Then blend only the join.
- Clean edge (optional): use the pencil tip to lightly sharpen the underside from mid-brow to tail, then brush again.
If you struggle with a harsh inner corner, pick a pencil you can apply with a light touch and still see colour. Clinique Quickliner™ For Brows (from £18.00) offers an ultra-fine tip with up to 24 hours of smudge and budge-proof wear, plus a spoolie for blending.
Prefer a different brush design for styling? Fenty Beauty Mvp Ultra Fine Brow (from £14.00) pairs an ultra-fine retractable tip with a paddle styling brush, and it focuses on creamy, longwear colour.
One sentence that saves brows: if the front looks like a line, brush it out until it doesn’t.

Step 5: Set the shape so it survives the day (and UK weather)
Setting does not have to mean crunchy brows.
With pencil, “setting” mostly means making sure the product grips and doesn’t migrate. In the UK, that can mean damp air, sudden rain, and indoor heating that dries skin so pigment clings in patches.
Choose a pencil with wear claims if you need reliability. Benefit Goof Proof Eyebrow Pencil states waterproof and smudge-proof wear, which helps if your brow area gets oily or you rub your face. MAC Pro Brow Definer 1Mm-Tip Brow Pencil also calls out waterproof and smudge-proof performance, with 24HR wear.
If you want a tool that builds fullness in layers, a multi-ended format can help you control density. Estée Lauder Brow Multi-Tasker Eyebrow Makeup (from £22.50) combines a triangular tip pencil, a sponge-tip applicator primed with brow powder, and a styling brush. That layout supports a pencil-first, powder-second approach without switching products.
Setting technique with pencil alone:
- After blending, press (don’t rub) the brow area lightly with a clean fingertip to help product mesh with hair.
- Recheck the tail. Add a final tiny stroke if it faded.
- Stop. Overworking creates shine and muddies colour.
For those who love a super-defined, microbladed-style finish without the blade, Anastasia Beverly Hills Archibrow Pencil (from £26.00) uses an ultra-thin, blade-tipped shape and claims up to 12-hour wear with smudge-proof performance. Use it sparingly. It can look too crisp if you build it like a normal pencil.
Fixing sparse or overplucked brows: realistic fill without a blocky shape
Sparse brows need strategy, not extra pressure.
If hair barely exists in an area, pigment sits directly on skin. Skin reflects light differently than hair, so a solid fill can look flat. The fix: create a soft base, then add a few deliberate strokes where hair should be. Leave space.
Three approaches that work well for different levels of sparseness:
- Light gaps: use a micro tip and add strokes only where you see skin. Benefit Precisely, My Brow Pencil (from £10.00) suits this “targeted strokes” style.
- Medium sparseness: lay a diffused base first, then detail. Benefit Gimme Brow+ Volumizing Pencil (from £9.65) uses fibres and powder to build soft volume on existing hairs, then you can top up shape with a finer pencil if needed.
- Very sparse tails: map and fill with a triangular pencil, then add hair strokes at the join so it doesn’t look like it starts suddenly. Anastasia Beverly Hills Rotulador Lápices De Cejas (from £9.10) gives you multiple stroke widths from one tip.
- Patchy, uneven front: use a slanted fine point to mimic individual hairs. Charlotte Tilbury Brow Lift (from £18.20) has a super-fine, slanted point designed to mimic individual hairs while adding structure.
Overplucked areas often tempt people into drawing a whole new brow above their natural line. We’d avoid that. A believable brow follows your existing hair placement, even if you improve it. Add height in tiny increments and reassess after blending.
If you want a budget-friendly ultra-fine retractable option for stroke work, NYX Micro Brow Pencil (from £7.50) focuses on an ultrafine precision tip for hairlike strokes, with a waxy pigment intended to help prevent smudging.
Common mistakes that make brows look unnatural (and how to correct them fast)
Most “bad brow days” come from the same handful of issues.
Fixing them usually takes 30 seconds. No panic. No full removal.
Mistake 1: A harsh inner edge
Cause: starting your fill at the front, or using the pencil point like a marker.
Fix: spoolie upwards repeatedly, then add 2–3 lighter strokes higher up, not at the base. Micro tips help here: Anastasia Beverly Hills Brow Wiz Deluxe (from £7.80) makes it easier to keep that front airy.
Mistake 2: The “one colour block” brow
Cause: too much base shading, not enough texture.
Fix: brush through, then add a few hair strokes only at the top of the brow and through sparse gaps. MAC Pro Brow Definer 1Mm-Tip Brow Pencil (from £19.20) works well for reintroducing texture thanks to the 1mm tip.
Mistake 3: Over-extending the tail
Cause: chasing symmetry by lengthening the shorter brow.
Fix: shorten both tails slightly. Seriously. A natural brow looks more balanced when both end at a similar point, even if that point sits a touch shorter.
Mistake 4: Drawing the top line too early
Cause: outlining like you would with eyeliner.
Fix: erase the top edge by brushing down and out, then rebuild the arch with a couple of strokes. A triangular pencil like Benefit Goof Proof Eyebrow Pencil (from £10.80) can fill quickly, but keep the top edge light until the end.
Mistake 5: Skipping on dry skin
Cause: drier brow area in winter, or product catching on texture.
Fix: use lighter pressure and more passes, then blend. A creamier longwear pencil can feel easier for this: Fenty Beauty Mvp Ultra Fine Brow (from £14.00) positions itself as creamy and longwear.
Practical tips you can use today (quick routine + shopping shortcuts)
If you only take one thing from this guide, take this: build from the middle, blend the front, then add a few strokes. That order prevents 90% of heavy-looking results.
A fast everyday routine that still looks natural:
- Map lightly (30 seconds).
- Shade the mid-brow to tail with light pressure (20 seconds).
- Brush through fully (15 seconds).
- Add 3–6 micro strokes at the front and a few in sparse spots (30 seconds).
- Brush the front upwards until it looks soft (15 seconds).
- Stop.
Shopping shortcuts based on what UK shoppers tend to want when they land on GlamGeek from search:
- For beginners: Benefit Goof Proof Eyebrow Pencil (from £10.80) gives easy shaping with waterproof, smudge-proof wear.
- For hair-like detail: Benefit Precisely, My Brow Pencil (from £10.00) or MAC Pro Brow Definer 1Mm-Tip Brow Pencil (from £19.20).
- For sparse brows needing soft fullness: Benefit Gimme Brow+ Volumizing Pencil (from £9.65) for fibres + powder volume.
- For multi-step in one tool: Estée Lauder Brow Multi-Tasker Eyebrow Makeup (from £22.50).
If you like browsing by brand, our merchant feeds often show strong availability across MAC, Estée Lauder, Clinique, and Charlotte Tilbury, with shopping split between Boots-style convenience and Space NK/Cult Beauty for premium shades.
Which brow problem do you want to solve first: a softer front, a fuller tail, or better symmetry? Tell us what you’re working with, and we’ll point you to the pencil style that makes it easiest.