Our price tracker shows a pattern every time a big event hits. Prom season, wedding weekends, Halloween. Orders spike for False Lashes, and the questions flood in about how to make a single pair last more than one night. The short answer: good cleaning, smart storage, and a clear line between safe reuse and risky overuse.
False lashes can handle multiple wears. Many pairs reach 10–20 uses if you treat them right. The trick is removing glue without pulling the band apart, keeping bacteria off the lash line, and preserving the curl. Do that, and you keep both your wallet and your eyes happy.
We wrote this guide to keep the process quick, hygienic, and repeatable. No complicated tools. No harsh chemicals near your eyeballs. Just practical steps that work, whether you shop at Sephora or throw a pack into your Target cart.
Why reuse requires real hygiene
Lash bands sit on the thinnest skin on your face. Oil, mascara, glue, and airborne particles collect on that strip fast. If you reuse without cleaning, you raise the chance of irritation. Redness, itching, and styes show up more with each unclean wear. Safe reuse starts the moment you remove them.
Events and seasons matter. Spring and fall sales pull many shoppers into restocks. Sephora’s Spring Savings typically lands in April. Ulta runs 21 Days of Beauty twice a year for, yes, 21 days at a time. Black Friday drops in late November. Stocking up helps, but cleaning stretches your budget even further, especially if you favor premium bands or hand-tied fibers.
Different climates also change the routine. Humid southern summers soften glue faster. Dry western air can make bands brittle. Cold northeastern winters can make eyes water and weaken adhesion. Adjust your cleaning and storage to match your weather and your eyelids will thank you.
Not all lashes clean the same way. Synthetic fibers handle moisture better than delicate “silk” or faux-mink styles. Individual clusters behave differently from full strips. Magnetic lashes avoid glue but still need regular wipe-downs. The steps below flag those differences so you don’t wreck a good pair with the wrong method.
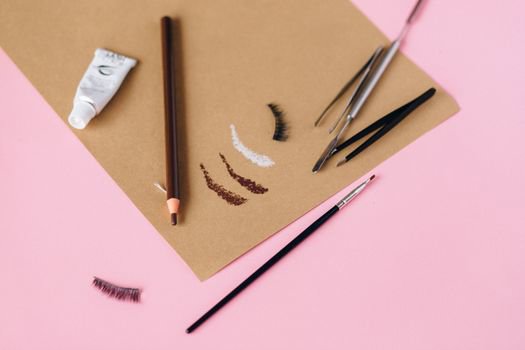
{{IMAGE:false lashes cleaning tools flatlay}}Know your lash and your adhesive
Start by identifying what you wear. That informs the whole routine and stops avoidable damage.
Strip lashes: These sit on a single band. Most come in synthetic fibers that tolerate careful cleaning. Hand-tied versions feel lighter but may fray if you soak them. Treat the band like a fragile seam.
Individual clusters: These small bunches bond to a few of your natural lashes or to the skin just above them. You clean them off the eye the same day when you use standard strip glue. If you use long-wear or professional adhesives, do not force removal. Use the matching remover and follow the brand’s timing exactly.
Magnetic lashes: These use a magnetized eyeliner or micro magnets along the band. You will not need glue removal. You still must wipe the magnets clean to keep a strong hold.
Adhesive types matter. Most strip glues contain cyanoacrylates. Some include latex. Latex-free formulas exist for sensitive eyes. Oil breaks down many glues. Oil also degrades magnetic liner hold. That matters when you decide how to clean. If you plan to reapply the same day, avoid oil cleansers on the eyelid. Use a water-based remover and keep oils for the very end of your skin routine.
Set up a clean station before you start
Clean space equals safer eyes. Set your area before you touch your lashes. You need a stable surface with good light and washed hands. Lay down a clean towel or a disposable pad.
Pull these tools:
- Pointed tweezers or a lash applicator (brands like Sephora Collection and Morphe offer affordable tools)
- Spoolie and micro swabs
- Oil-free eye makeup remover or micellar water
- 70% isopropyl alcohol in a small cup (for band sanitation only)
- Lint-free cotton pads
- A clean lash tray or a curved holder
Use oil-free remover for glues that reapply the next day. Save oil cleansers for end-of-week deep cleans if you notice stubborn buildup. Keep alcohol at 70%. Higher concentrations evaporate too fast and can irritate the skin. Lower concentrations may not sanitize as well.
Keep contact lens wearers in mind. If you wear lenses, remove them first. Your lashes will sit closer to your natural lash line, so keep your tools extra clean. If your eyes run easily, set a tissue nearby and work slowly.
{{IMAGE:woman cleaning false lashes with tweezers}}Remove glue without wrecking the band
Work from the ends toward the center. Grip the outer corner with tweezers or a lash tool. Lift gently. Do not yank. If the band resists, pause and soften the glue.
Soften the adhesive without soaking the fibers. Dampen a cotton pad with oil-free remover or micellar water. Fold it around the band, not the lash tips. Hold for 30–60 seconds. The goal is tacky glue that releases, not a wet lash that loses shape.
Pinch the glue, not the band. Once the glue loosens, roll it off the strip with your fingers or a pair of clean tweezers. You should feel it lift like a thin thread. If bits remain, touch a micro swab dipped in remover to the residue and repeat. Keep remover away from the lash tips to protect the curl.
Waterproof mascara complicates removal. If you coated the falsies with heavy mascara, you may have fused fiber to fiber. We suggest you skip mascara directly on the falsies next time. Apply mascara to your natural lashes first. Then place the strip. If you insist on mascara for blending, choose tubing formulas and apply one light coat. If you need a formula swap, browse Mascaras and look for removable, film-forming options.
For magnetic lashes, clean the liner off your eyelid first. Then wipe the magnets on the band with a damp micro swab. Remove any liner flakes. Do not soak magnets. Dry them fully before storage to maintain the grip.
Sanitize the smart way: band only
Clean does not mean a soak. Extended submersion can warp fibers and lift knots. You only need to sanitize the part that touches skin: the band.
Use 70% isopropyl alcohol sparingly. Pour a small amount into a clean cup. Dip a micro swab. Swipe the band from end to end on the underside and top edge. Keep the swab off the fibers. Alcohol can make fibers brittle if it wicks up the lash.
Let the band air-dry for at least 10 minutes. Alcohol evaporates fast, but give it time. You want a dry, clean strip before you reshape and store.
Sensitive eyes need options. If alcohol stings your eyes even after full dry-time, try a gentle, oil-free cleanser on a swab and rinse with a lightly dampened pad. Then let the band dry for 15–20 minutes. If you fight recurring irritation, consider a latex-free adhesive. Check brand pages like Clinique for gentle eye-area removers and soothing skincare to pair with your lash routine.
Magnetic bands still need a wipe. Use micellar water first to lift makeup residue. If you see debris on the magnets, follow with an alcohol swab just on the metal spots. Dry them fully to prevent rust or weakened hold.
Dry, reshape, and revive the curl
The dry stage seals your hard work. A wet or tacky lash bends out of shape in seconds. Give it structure before you box it up.
Blot the band with a lint-free pad. Do not squeeze the lash tips. Once the band feels dry, wrap the lash around a clean brush handle or a curler body for 2–3 minutes. This restores the C-curve that hugs your lash line.
Check spacing. Fans should look even. If you see gaps, resist the urge to tug fibers back into place. Instead, pinch the base gently to coax them together. Heavy reshaping often snaps knots in hand-tied styles.
If your lash lost its lift, skip hot tools. Heat can melt synthetic fibers. Try a clean, dry curler on your natural lashes after the falsies go on. Focus on blending your own lashes up into the strip. If you need tools, browse Makeup Brushes & Applicators for spoolies and applicators that help set shape without risk.
{{IMAGE:false lashes storage case tidy}}Liner, shadow, and mascara: what to do on falsies
Eye makeup builds up on strips fast. Manage the order of operations to keep cleaning simple.
Do your liner and shadow first. Let both set for a minute. Then apply your falsies. That order keeps cream and powder off the lash fibers and band. You will remove fewer particles later.
Keep mascara on your natural lashes. One light coat lifts and adds grip. Let it dry for 30–60 seconds. Then apply the falsies. If you coat the falsies with mascara, they will clump. You also make glue removal harder. Over time, fibers stick together and shed.
After wear, sweep a dry spoolie through the falsies from base to tip. Use quick, upward strokes. This flicks off shadow fallout without wetting the curl. If residue remains at the base, tap a micro swab with micellar water and dot the band only. Always finish by drying and reshaping as above.
If you need a new mascara that washes off cleanly, compare formulas in Mascaras. Tubing formulas remove with warm water and light pressure. That reduces tugging on your lash line before you place strips.
Storage that protects shape and keeps bacteria down
Store your lashes like a tiny garment. Shape matters. Clean air matters. Tossing them in a purse pocket invites dust and bent corners.
Use the original tray. Most trays hold the lash curve. Press each band back on the half-moon after it dries. If you lose the tray, use a curved holder or a small, clean pill organizer. Label the left and right sides if the lashes differ.
Keep cases dry and closed. A damp case promotes bacterial growth. If you live in a humid area, slip a mini desiccant packet into your lash case. You can save one from a new shoe box or vitamin jar. Replace it when it loses effect.
Track wears. Aim for 10–20 uses on quality synthetic strips. Lighter hand-tied styles may last 8–12. Clusters often wear fewer times. Keep a quick note on the tray with a fine marker. If you shop across retailers, add your go-to pair to your GlamGeek wishlist. We will ping you when the price drops across Sephora, Ulta, Target, Amazon, or Nordstrom. That way you replace on a deal, not in a rush.
When to retire a pair (and why it matters)
You save money when you reuse, but you should not drag a tired strip past its limit. Old bands twist, fibers shed, and residue hides in creases you cannot reach. Your eye area pays the price.
Retire your pair if you see any of these:
- Frayed or split band edges
- Warped shape you cannot restore with a curve hold
- Missing chunks of fibers or obvious bald spots
- Stubborn residue that returns after cleaning
- Irritation after normal wear
Also retire the pair after any eye infection. Do not attempt to sanitize and save in that case. Your eye health comes first. Replace the pair and consider a gentler routine while your eyes recover.
Dispose of old lashes responsibly. Most synthetic fibers do not recycle through curbside programs. You can reduce waste by choosing durable styles you will actually wear 10–20 times. Some beauty stores offer take-back bins for mixed beauty items. Call ahead to confirm. When in doubt, store used pairs in a small sealed bag before tossing them. Clean cases can live on for the next set.
Special notes for sensitive eyes and contact lens wearers
If your eyes react easily, design your lash routine around comfort. Patch test adhesives on the inner arm for 24 hours before the first wear. Choose latex-free and low-fume formulas. Apply glue sparingly. A thin, even line holds better than blobs.
Ventilation helps. Cyanoacrylate fumes rise during dry-down. Fans and open windows reduce exposure. Let the glue go tacky for 30–45 seconds before placement. Tack prevents sliding, which prevents extra touches and tears.
Keep removers gentle. Look for oil-free, fragrance-free formulas. Clean the band with alcohol only if you can keep it off the fibers and your skin. If alcohol stings, use micellar water on a cotton tip and extend the dry time to 20 minutes. If you still feel irritation, take a break from falsies and speak with a professional.
Contact lens wearers should insert lenses after finishing eye makeup. Remove lenses before taking off your falsies at night. That order reduces debris under the lens edge and keeps the cornea clear.
Pro application habits that extend lash life
Better application creates easier removal. Fewer touch-ups mean less stress on the band. That equals more wears.
Use a thin glue layer. Trace the band edge and add a tiny dot at each end. Let it set for 30–45 seconds. Place the center first. Set the inner corner. Finish with the outer corner. Press the band with a lash tool, not your nails.
Avoid oily lids. Use an eye primer or a light dusting of translucent powder on the lash line. Oil breaks glue fast, especially in humid states. If you live in the deep south in summer, pack blotting papers. Dab the lid before application.
Skip waterproof products near the band. Waterproof eyeliner and mascara need strong removers. Strong removers can seep into knots and weaken fibers. If you love a crisp wing, favor long-wear pens that remove with warm water and light cleanser. Save the heavy-duty formulas for days without falsies.
Toss a basic kit into your bag for long events. Include a mini glue, a spoolie, and a clean micro swab. If the inner corner lifts at hour six, you can fix it without loading extra glue. That repair protects the band from crusty build-up later.
Choosing lashes that clean and last
Not every lash justifies a long cleaning session. Some styles last longer and resist damage. Others look great once and fall apart soon after. Choose based on fiber, band, and density.
Pick flexible bands. Thin cotton or soft synthetic bands mold to the eye and release glue cleanly. Thick, rigid bands grab skin and fight removal. Those bands also crack sooner. Inspect the lash in the tray. If it springs flat, skip it. If it holds a C-curve, that’s a good sign.
Opt for mid-density fibers. Ultra-dense sets look dramatic but trap more product. Mid-density pairs still give volume without heavy cleaning needs. You can comb them without snagging. You can also spot-clean the band without wetting half the lash.
Buy multi-packs if you wear lashes often. We see broad stock across Target, Ulta, and Amazon at the budget end, and across Sephora, Nordstrom, and Bluemercury for more premium styles. Check our False Lashes category and add your favorites to your GlamGeek wishlist. We track prices daily so you don’t have to scan every retailer page.
Tools matter too. A reliable applicator and a fine-tip tweezer help you place and remove with control. That control saves the band. Compare tool sets from Sephora Collection and Morphe on our Makeup Brushes & Applicators page. Click the price comparison before you check out. We often see meaningful differences between stores on the same day.
What this means for your routine
If you care for the band and control residue, your lashes will return to the tray ready for the next night out. Clean the band after every wear. Sanitize with 70% alcohol sparingly. Dry and reshape before storage. Skip mascara on the falsies. Track wears and retire on time. This routine takes under 10 minutes once you build the habit.
The budget effect adds up. A pair that lasts 12 wears costs a fraction per use versus a one-and-done strip. Our platform tracks sales across Sephora, Ulta, Target, Amazon, and Nordstrom. Add your go-to lash style and a reliable lash tool to your GlamGeek wishlist. We will alert you when a sale hits, during Spring Savings, 21 Days of Beauty, or a random Tuesday markdown. You save money and avoid frantic last-minute buys.
Keep comfort front and center. If any step stings or irritates, scale back and simplify. Your eyes should feel calm by bedtime and fresh the next morning. Clean lashes help that happen. Dirty bands do not.
Over to you
How many wears do you usually get from your favorite pair? Do you clean after every use or batch-clean once a week? Tell us your tips, your favorite tools, and the styles you reach for most. And if you want a price drop alert before your next restock, add your picks from False Lashes and your go-to Makeup Brushes & Applicators to your GlamGeek wishlist. We will do the tracking so you can get back to the fun part: the flutter.