Searches for lash glue jump every party season on GlamGeek. The pattern repeats before weddings and graduations too. It tells us one thing: even the best lashes fall flat when the glue under-delivers.
Plenty of us obsess over lash styles and skip the adhesive. That choice often backfires by 10pm. The right glue fixes flicked-up corners, resists humidity, and survives a happy tear. It also comes off cleanly when you head home. We break down what to buy, why it works, and how to make it last.
Across our merchant feed, we see new latex-free options land almost every quarter. Brush-on formats now dominate listings. Dry times sit on most product pages, but they vary widely. Tube size, finish, and formula still confuse shoppers. We organise the noise so you can shop faster and stick lashes on once.
Most strip-lash glues sit in 5–7 ml sizes. Many list a 6M to 12M period-after-opening symbol. Most claim a 20–60 second dry-down. That range matters because your eye shape, eyelid oiliness, and skill level all change what works best. UK weather adds another layer. Damp winters, steamy commutes, and indoor heating can nudge a corner loose by lunch if you pick the wrong formula.
Retailers also price adhesives unevenly. We often see the same tube at Boots, Superdrug, and Lookfantastic with different promotions. Premium brands lean into black-tinted bonds and sleeker brushes. High-street brands push clear, quick-dry picks. Check our price comparison before you add to basket. Pop a favourite into your wishlist and we will ping you when the price drops.
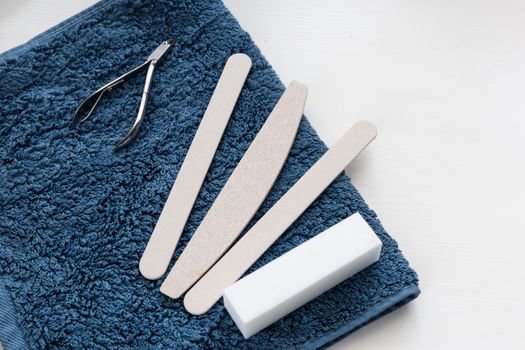
{{IMAGE:woman applying false lashes close-up}}Clear vs dark: which finish suits your look and skill level
Clear adhesive helps most beginners. It dries transparent and forgives a wobbly hand. If you miss the band by a millimetre, clear glue does not scream for attention. It suits soft daytime looks and half-lashes on the outer corner. It also pairs with pastel shadow and minimal liner. You get less risk of a harsh seam.
Dark adhesive adds definition. It dries black, so it doubles as a liner shadow. That boosts volume at the root of the lash. It suits smokey eyes and thicker bands. If you already wear liquid liner, dark glue can blend the join. You must place it well though. A slip can stain shimmers or pencil work. Keep micellar on a cotton bud nearby if you choose dark.
Clear glue also works with brown mascara and soft glam. Dark glue works with bold styles and full glam. Both can hold well if you apply them correctly. The finish alone does not decide longevity. Your prep and the lash band thickness matter more. We rate clear for practice, dark for speed if you line daily.
Brand ranges reflect that split. You will find clear and dark options across high-street and pro lines from MAC, KIKO, Morphe, and Sephora Collection. If you swap finishes often, add both to your GlamGeek wishlist. Our alerts save you checking five retailers on a Friday afternoon.
Latex-free vs latex-based: sensitivity, wear, and who should switch
Most classic strip-lash glues used rubber latex for flexibility. Many still do. Latex grips, flexes, and handles British drizzle well. It also peels off in one go when you remove it. The downside? Latex allergies exist, and even mild sensitivity can show up as stingy lids or redness. If your lids feel tight or itchy after wear, move away from latex.
Latex-free glues use synthetic polymers, often acrylate-based. They mimic the flex of latex without the same allergen risk. They can feel slightly less stretchy during removal, but modern latex-free formulas close the gap. If you wear contact lenses, struggle with hay fever, or have a sensitive eye area, try latex-free first. Patch test along the jawline 24 hours before a big event. You will not want a reaction on the day.
Read labels with care. Brands usually flag latex-free on the front. If they do not, scan the INCI for “latex” or check for acrylate copolymers. Avoid cyanoacrylate-based lash extension glues for strip lashes. They cure too hard and give off strong fumes. Save those for salon pros working on individual extensions. Your natural lashes and your eyes will thank you.
We spot more latex-free listings across Boots and Superdrug every year. Pro brands lean latex-free too. You can filter your search on GlamGeek and compare reviews before you switch. Add your pick to your wishlist to catch a code at Space NK or Lookfantastic when it appears.
Dry time, hold strength, and finish: match glue to eye shape and day
Dry time sits on most product pages, but brands time it in a lab, not on a train platform in drizzle. Treat the number as a guide. A 20–30 second tack suits experienced hands and quick mornings. A 40–60 second tack helps beginners because the glue stays movable longer. If your inner corners pop up, aim for a tackier stage. Wait until the glue turns slightly opaque or thicker, then place the lash.
Hold strength should match your plan. Heading to a wedding or a hot dancefloor? Choose a strong-hold claim. Going to the office? A standard hold will feel more comfortable for eight hours. Strong hold formulas grip well but can feel tight on thinner lids. If your eyes water, pick a fast set time to reduce slip while you blink.
Finish matters less than placement, but a satin-dry glue hides best under liner. Some glues dry shiny. If yours does, tap a tiny bit of matte shadow along the band once it sets. Dark adhesives hide shine because they read as eyeliner. Clear adhesives can flash under flash if they stay glossy. Look for “matte” or “satin” in the copy if you shoot photos.
We see descriptions vary by brand, so rely on reviews and our filters. Compare holds and dry times on GlamGeek, then add a couple to your basket. A back-up tube saves a face when one formula hates the weather.
Brush-on vs tube, minis vs full size: the packaging that helps you win
Brush-on glue changed the lash game for speed and accuracy. The slim brush paints a thin, even coat. You can dot extra adhesive on the inner and outer thirds without flooding the band. It suits thin bands and half-lashes. It also suits anyone who wants to avoid squeezing from a tube mid-rush. Many latex-free formulas use brush packaging because it seals well and travels better.
Classic squeezy tubes still sell for a reason. They last and they cost less per millilitre. They work for thicker bands and heavy glam that need more glue. You will need a clean surface or a disposable palette if you like to pre-load a tool. Squeeze sparingly. A thick bead takes ages to go tacky. It can swim into liner or shadow and make a mess.
Minis help you test formulas. Most minis run 2–3 ml. That size finishes before the glue thickens from air. If you wear lashes once a month, buy minis and replace them often. If you wear lashes three times a week, a full-size brush-on makes more sense.
Keep the cap tight. Store glue upright. Wipe the neck with a tissue to stop the lid sealing shut. Replace when the glue strings, smells odd, or separates. Many glues list 6M on the label. Stick to that. Old glue loses hold and irritates eyes.
{{IMAGE:clear vs dark lash glue swatches}}How to stop corners lifting: prep, placement, and tiny tweaks
Corners lift for three reasons: oil, movement, and too little glue. Fix all three and you fix the wobble. Start with clean lids. Remove skincare residue. Eye cream and facial oil sit on the lash line and fight glue. Use a cotton bud with micellar, then dry the skin. If your lids run oily by noon, tap a touch of primer on the lash line. A small amount goes a long way. You can also dust a translucent powder to grip the band. A thin layer works best.
Pre-bend the lash. Wrap the strip around your finger for 30 seconds. Bend the ends in slightly. That shape matches the curve of your lash line, so the tips sit flat. Trim the lash to size. A long band buckles at the ends and lifts as you blink. Cut from the outer end and keep the shape intact. If your inner eye hates a full strip, wear a half-lash instead. They look chic and never stab your tear duct.
Apply more glue at the ends. Paint a thin line across the band, then dot a tiny extra bead on each corner. Wait for the tack stage. Place the centre first. Tuck in the outer corner. Tuck in the inner corner last. Press along the band with the back of tweezers or a silicone applicator. Hold each corner for five seconds. That short hold gives the glue time to grip.
Waterline liner can also help. Draw a thin line on the upper waterline to hide gaps. Then add liquid liner after the lash sets. If you use dark glue, you can skip this step. If your eyes water when you do your lower lash line, do it last. Keep tears away from fresh glue.
Need tools? Look at angled tweezers and soft-tip applicators under Makeup Brushes & Applicators. A good tool shortens the learning curve. Add one to your wishlist so you catch a sale at Beauty Bay or Lookfantastic.
Humidity, tears, and UK weather: waterproof claims decoded
Waterproof claims sound bold. Read them as “resistant” not “bulletproof”. A strip-lash glue should handle drizzle, a bus queue, and a brief tear. It should not sit through a downpour or a spin class. If your day includes weather risk, pack a mini. Dark formulas smear if they meet water before they cure. Clear formulas turn milky, then dry clear again. If you expect tears, choose a quicker dry time and wait the full minute before you blink.
Winter brings central heating and dry office air. That can shrink and curl strips in the box. Gently flex the band before wear. Summer brings sweat at the temples. Pat the area dry before you apply. If you dance, consider a half-lash or clusters on the outer corner. Less surface area means fewer failure points.
Use setting products where they help. A tiny sweep of eyeshadow primer on the lash line can improve grip. You can find options under Face Primers. Pick a clear or skin-tone primer, not a slippy silicone-only base. Keep oils away from the lash line during the day. Save balm cleansers for removal at night.
We track lots of waterproof claims on product pages. Some glues overpromise. Reviews on GlamGeek often call that out. Filter by “holds well” and “easy removal” to spot keepers. You can compare high-street picks from Revolution with pro lines from MAC or Morphe in one place.
Pairing glue to lash style: thin bands, heavy glam, and half-lashes
Thin, flexible bands need less glue. Use a brush-on clear formula and a light hand. The band sits closer to your own lashes and moves with your lid. That combo looks natural and stays comfy for long days. A thick bead on a thin band bleeds into your liner and slows dry time.
Thicker bands and dramatic styles need a touch more hold. A dark, strong-hold formula makes sense if you wear a bold liner. Brush it on, dot the corners, and let it go tacky for up to 45 seconds. Press with intent. Tuck the inner corner last and hold it. Heavy glam needs that extra patience.
Half-lashes and accent clusters love speed. Use a fast-dry glue so they set before your next blink. Clear or dark both work. Clear suits a bare lid. Dark suits a wing. If you stack clusters, paint a thin line where you plan to place them. Then add a small dot to each cluster base. You get a stronger bond and less swivel.
If you swap styles often, keep two formulas. A clear brush-on covers natural days. A dark strong-hold handles nights out. We cover a wide range of styles under False Lashes if you want to upgrade your stash at the same time.
Sensitive eyes, contact lenses, and safety: read this before you stick
If your eyes water easily, avoid fragranced glues. Scan for parfum on the INCI list and skip it. Choose latex-free and quick-set. A faster cure produces fewer fumes near your eye. Apply in a well-ventilated room and look down while it sets. That angle keeps vapour away from your cornea.
Do not share glue. Do not use old glue. Close the cap tight. A brush that touches your lash band picks up bacteria from your skin. Replace the tube on schedule. If you develop redness, itching, or swelling, stop using the glue and speak to a pharmacist. Keep extensions and strip lashes separate. Never use salon-grade extension adhesive for strip lashes at home.
Patch test if you have a history of reactions. Place a tiny amount behind your ear or along the jawline 24 hours before you wear it on your eyes. Watch for redness or itch. If you react, stick with latex-free and try another brand. Sephora Collection, KIKO, and Revolution often list clear “free-from” claims clearly. You can scan the ingredient list and compare on GlamGeek without opening five tabs.
Contact lens wearers should insert lenses before makeup. That timing avoids trapping glue residue under a lens. Remove lenses before you cleanse at night. Use an oil-based remover to break down glue on the lash band after you take the strip off. Then cleanse the eye area with a gentle formula to lift the film fully.
Application order and removal: keep it clean, keep it quick
Order matters. Do base makeup, shadow, and liner first. Curl your natural lashes and add a light coat of mascara. Mascara gives the strip something to grip. Then apply glue to the strip. Let it reach the tacky stage. Place the lash. Press along the band. Add liner last to hide the seam if you used clear glue.
If you like a clean band for reuse, avoid heavy mascara after you apply the strip. Mascara gums up the false lash and shortens its life. Use a lash comb to blend instead. When you remove them, peel from the outer corner gently. Do not yank. If a corner sticks, dab a little eye-safe remover along the band and wait ten seconds. The strip should slide off.
Clean the band. Hold the lash with tweezers and pick off glue residue. Wipe the band with micellar on a cotton bud. Let it dry and place it back in the tray. A clean band sticks better next time. A dirty band repels glue and lifts sooner. If the band frays or warps, retire it. Fresh strips look better than a rescue mission at 7am.
Store your glue upright, away from heat. Cap it tight. Replace it if it thickens or smells off. Many users stretch a tube for a year. We see better results when people stick to the 6–12 month window. Fresh glue holds, old glue argues.
High-street vs premium: what you really get for the upcharge
Premium glues often give you a nicer brush and a sleeker dry-down. They may set a touch faster and feel lighter on the lid. They also tend to come in black and clear within the same range, so you can switch finishes without changing texture. You pay for that balance and packaging.
High-street options hold their own on performance. Many drugstore tubes grip all night if you prep and place well. They may dry glossier or take ten seconds longer to reach tack. For most, that difference does not matter. You can blot shine with a brush or set a timer on your phone.
We rate pro lines from MAC and mainstream picks from Revolution, Morphe, and KIKO. Check our comparison tool to see where Boots, Superdrug, Lookfantastic, and Beauty Bay sit on a given day. Add your top two to a wishlist. GlamGeek will nudge you when the price shifts.
Troubleshooting fast: quick fixes for real-life fails
Lash sliding on the inner corner? Add a micro-dot of glue to your eyelid where the band will sit. Let it go tacky. Then place the strip. That dot acts like an anchor. Use clear glue for this move if you wear minimal liner.
Band too stiff? Roll it around a pencil for a minute. Trim one extra cluster off the outer corner so it follows your eye better. A stiff band will spring up if it overshoots the natural curve. Shortening helps.
Glue stringing from the brush? Wipe the excess on the tube neck. If it still strings, the glue has aged. Replace it. Stringy glue never settles smooth and often flakes off early.
Corner keeps stabbing? Switch to a half-lash or feathered style. You can find plenty under False Lashes and compare styles across brands in minutes. Lightweight bands give you comfort and a better stick.
What this means for your lash kit
You do not need every glue on the shelf. Build a small, smart kit. Pick one clear brush-on for natural looks and practice days. Pick one dark, strong-hold for nights out or smokey eyes. Keep a mini as a handbag back-up. Replace them on schedule so you never fight an old, gummy tube.
Match your glue to your lash band. Thin and flexible bands love light, clear coats. Thick bands like a touch more glue and benefit from a dark finish. Choose latex-free if you wear contact lenses or have any history of sensitivity. Add a primer step on oily lids. Dot extra glue on the corners. Wait for tack. Place centre, outer, inner. Press. Done.
Make the most of the market. We track prices across Boots, Superdrug, Space NK, Lookfantastic, and Beauty Bay so you do not have to. Use GlamGeek to compare finishes, dry times, and claims. Add your short list to your wishlist. We will ping you when retailers run codes or drop prices. You get better glue, and your lashes stay on through the last dance.
Ready to build a glue lineup that behaves on Monday and on a wedding Saturday? Which finish do you reach for most: clear or dark? Tell us, and tag the lash styles you love so others can shop smarter.